
Install Guide
Install your iPad eSIM before you fly.
Use direct install, scan the QR code from another screen, or enter the activation details manually while connected to the internet.
Before you start
Confirm that your iPad has a Cellular Data or Mobile Data section in Settings and shows an EID under Settings > General > About.
Make sure the iPad is not restricted to a different carrier before purchasing a travel eSIM.
Keep your order page, email, or another screen ready so the QR code stays visible during setup.
Install before you fly. Every Pelesim plan starts on first use at your destination, not at install time, so setting up early never costs you plan days.
Do not delete the eSIM after installation unless support asks you to. Most travel eSIMs cannot be reissued instantly.
Install steps
Follow the flow in order so the eSIM installs cleanly the first time.
- 1
Open your Pelesim install details
Open your order or portal and keep the direct install link, QR code, and manual activation details available.
- 2
Open the eSIM setup menu
On iPad, open Settings > Cellular Data or Mobile Data, then choose Add eSIM or Add a New Plan.
- 3
Install directly, scan, or enter details manually
Use the direct install link when offered. Otherwise scan the QR code from another screen or enter the SM-DP+ address and activation code manually.
- 4
Label the travel plan
Choose a clear label such as Pelesim, Travel, or the destination name so the plan is easy to identify later.
- 5
Choose the travel eSIM for cellular data
Select the Pelesim eSIM as the cellular data plan when you are ready to use it.
- 6
Turn on Data Roaming for the travel eSIM
On iPad, Data Roaming sits one level deeper than on iPhone. Open Settings > Cellular Data > Cellular Data Options and enable Data Roaming so the plan can connect to partner networks abroad.
Travel-ready settings
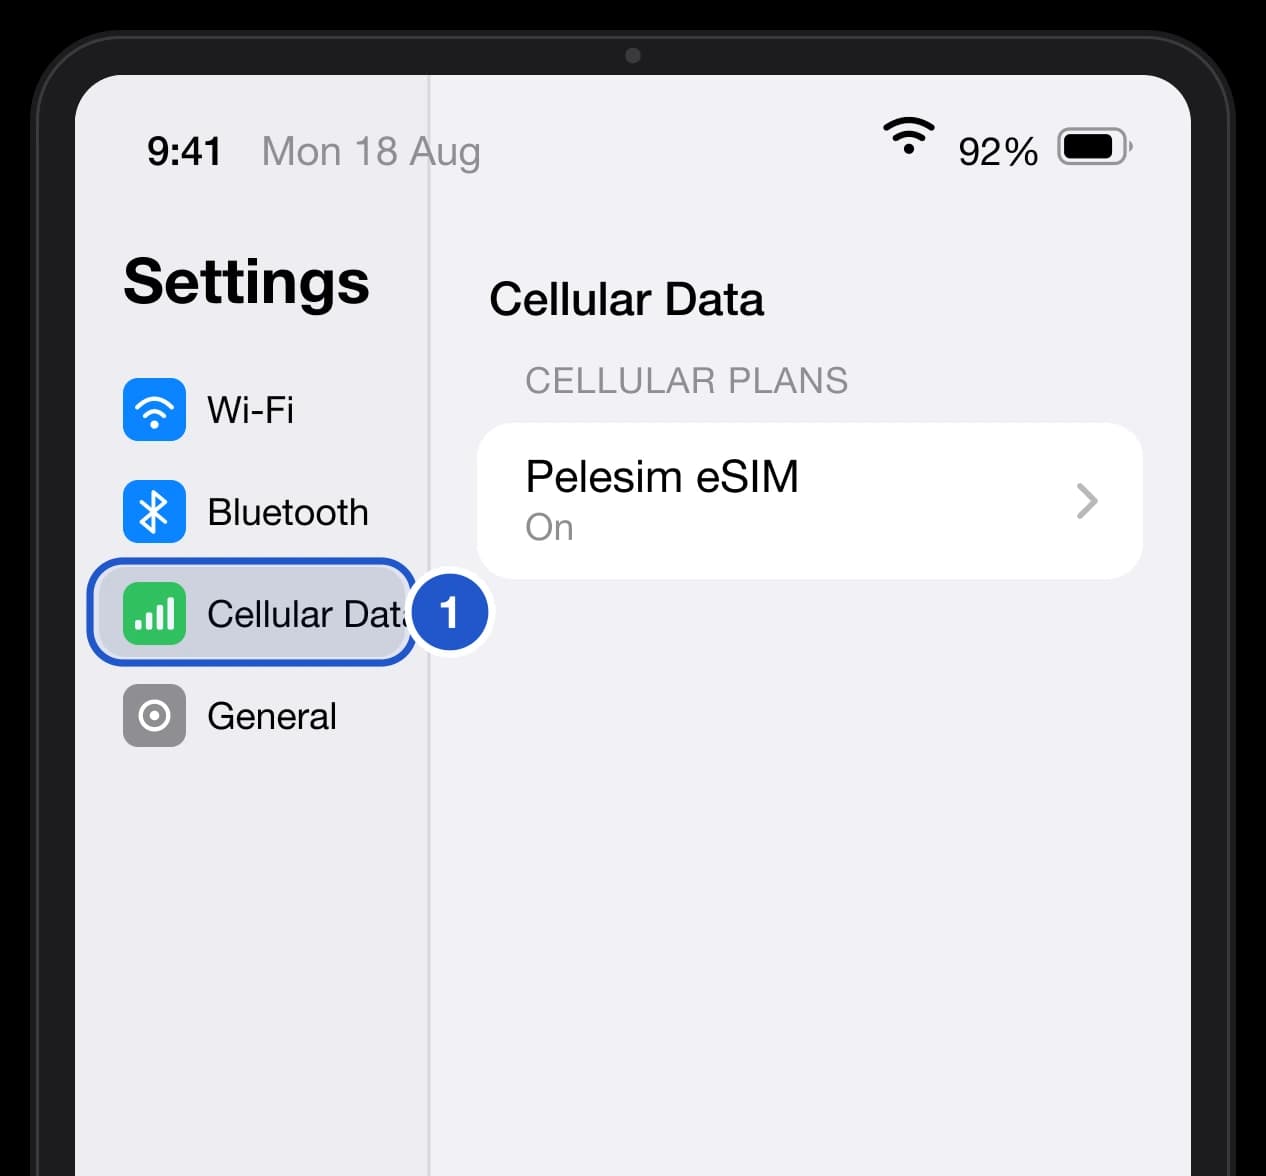
Open Cellular Data.
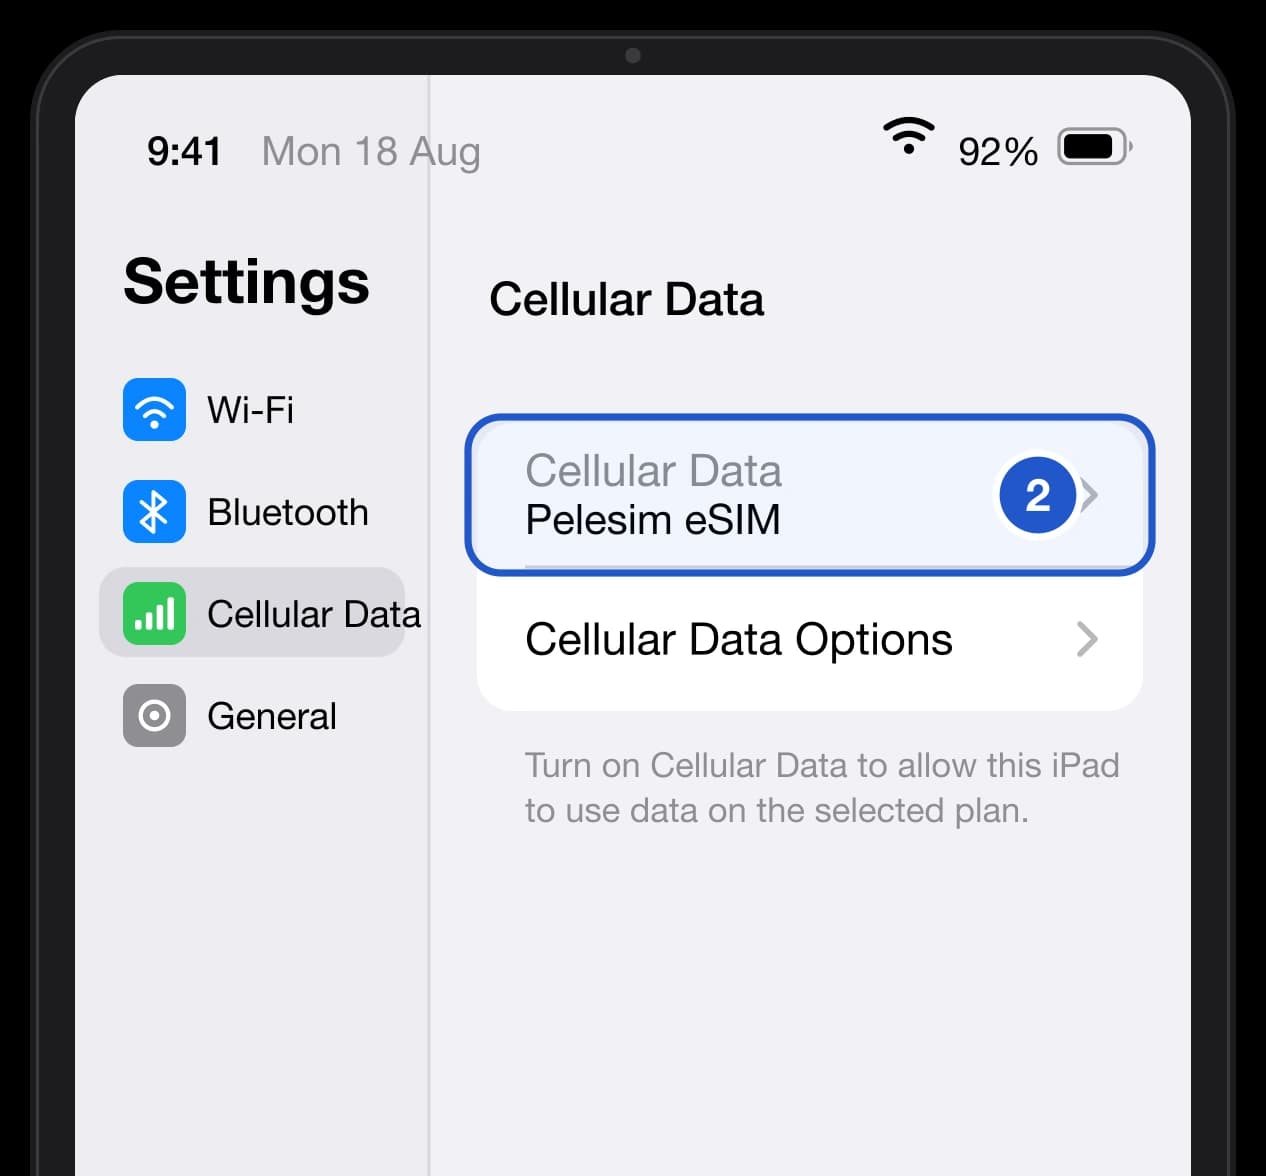
Pick the Pelesim plan for data.
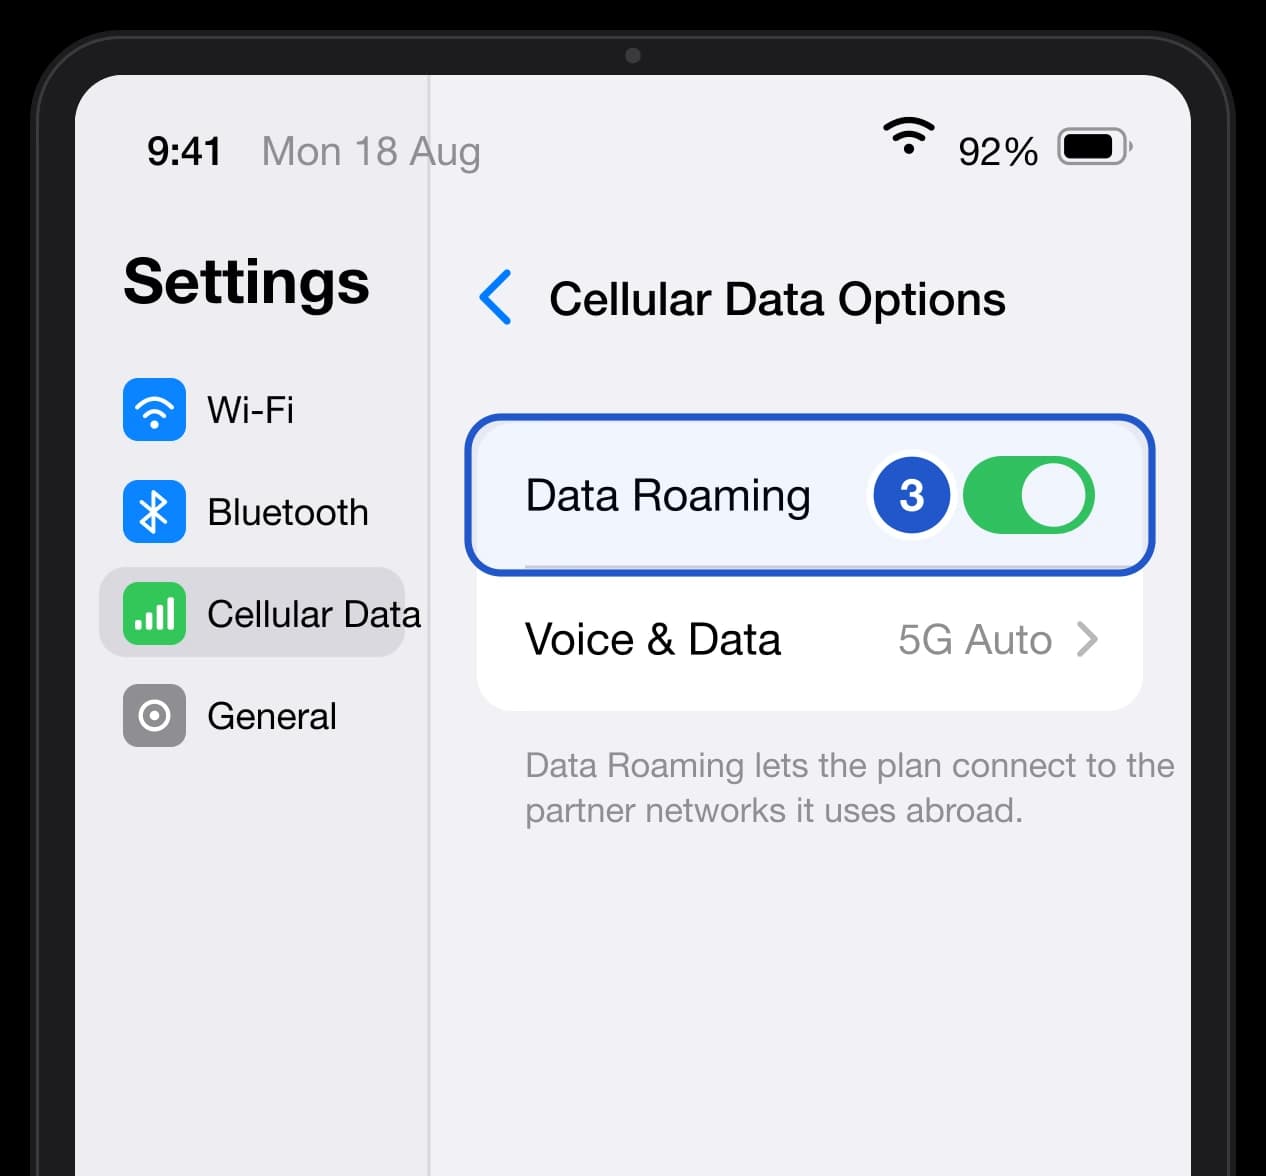
In Cellular Data Options, turn Roaming on.
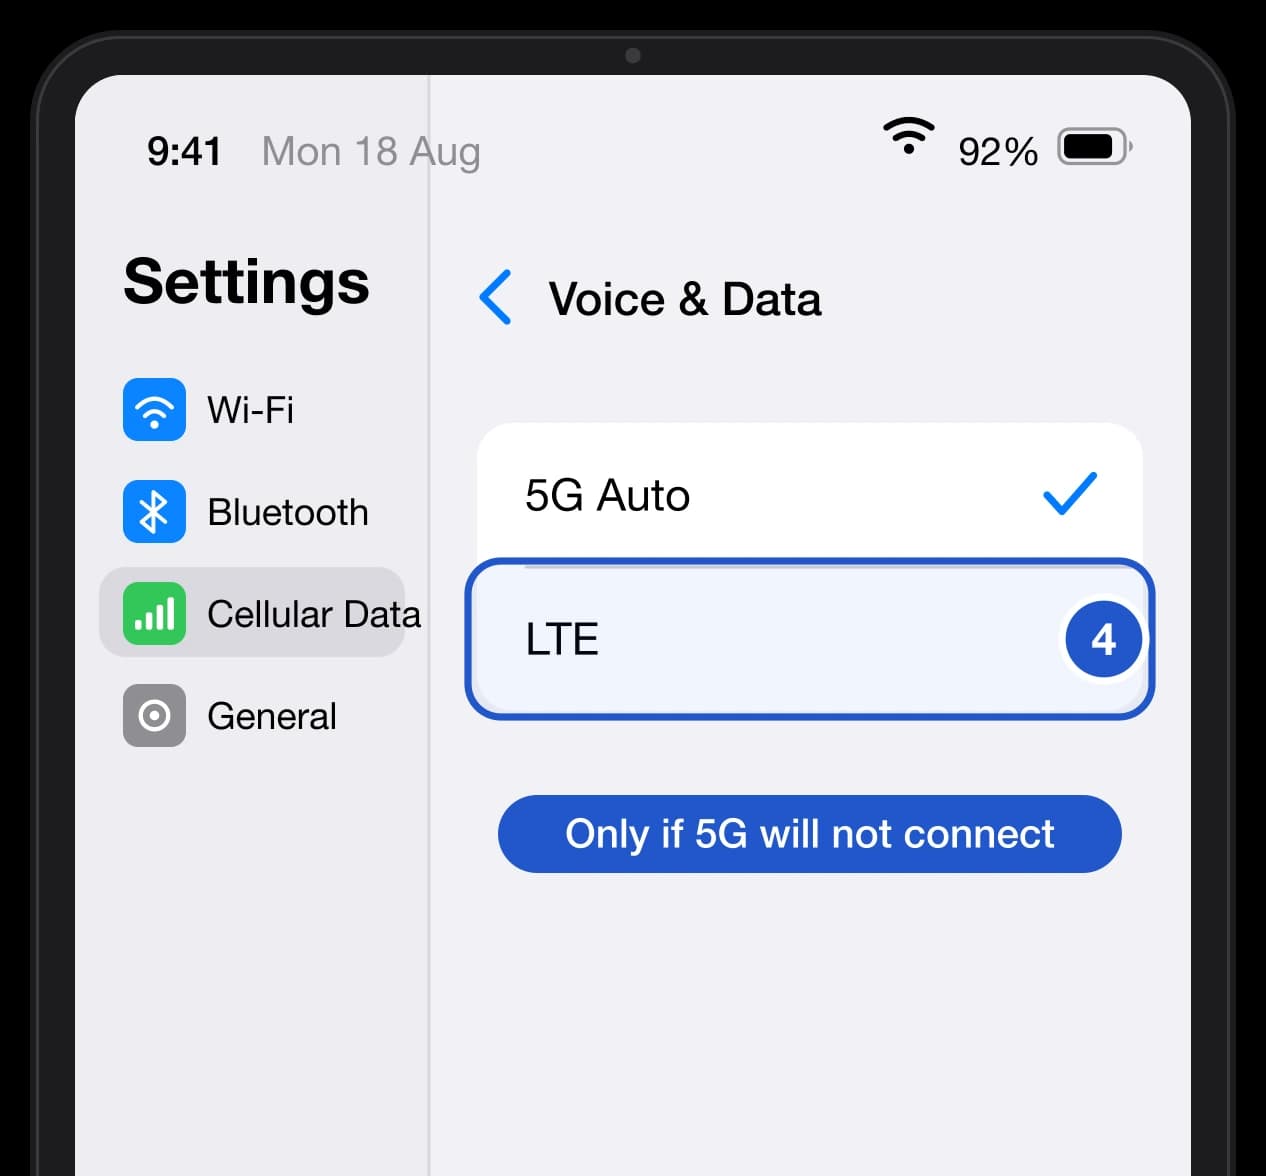
Switch to LTE only if 5G fails.
Select the Pelesim plan for cellular data, turn Data Roaming on in Cellular Data Options, and try LTE if the plan will not connect on 5G.
Choose the data plan: Settings > Cellular Data or Mobile Data > Cellular Data > Pelesim eSIM
Roaming and network type: Settings > Cellular Data > Cellular Data Options > Data Roaming or Voice & Data
Use the Pelesim eSIM for cellular data when traveling.
Turn on Data Roaming under Settings > Cellular Data > Cellular Data Options. On iPad it lives there, not on the plan itself.
Keep automatic cellular data switching off if another data plan remains installed.
Leave the plan on 5G Auto while it works. Travel eSIMs mostly ride 4G/LTE partner networks abroad, so if the plan will not attach or shows no data, set it to LTE under Settings > Cellular Data > Cellular Data Options > Voice & Data.
If the network does not attach after arrival, toggle airplane mode on and then back off.
Installed but not connecting?
In order. Most cases are fixed by the first two.
Settings > Cellular/Mobile Data > Cellular Data > the Pelesim plan
On this eSIM, not your home SIM.
Settings > Cellular/Mobile Data > the Pelesim plan > Data Roaming
Settings > Cellular Data > the Pelesim plan > Voice & Data > LTE
See Coverage on your eSIM in My eSIMs.
Settings > Cellular Data > Network Selection > Automatic off
Troubleshooting
Most install issues come from scanning, compatibility, or data-line settings.
No Cellular Data section appears
The iPad may be a Wi-Fi-only model. Open Settings > General > About and look for an EID to confirm eSIM hardware.
QR code will not scan
Show the complete QR code on another bright screen, then try again from the Add eSIM flow.
Need manual installation instead
Use the SM-DP+ address and activation code from your Pelesim install details when QR scanning is unavailable.
Installed but not connecting
Confirm the Pelesim plan is enabled, selected for cellular data, and has Data Roaming turned on. Then toggle airplane mode and retry.
Shows a network but no data works
Switch the plan from 5G to 4G/LTE: Settings > Cellular Data > Cellular Data Options > Voice & Data, and choose LTE. Then toggle airplane mode on and off. Partner networks abroad often accept the eSIM on 4G/LTE when 5G registration fails, and you can move back to 5G Auto once you are online.
Still no service after arrival
Choose a network by hand: Settings > Cellular Data > Cellular Data Options > Network Selection, turn Automatic off, wait for the scan, and pick a network your plan covers. Open Coverage on the eSIM in My eSIMs to see the partner networks the plan uses in each country, which is also how you find the right one on a regional or Global plan. If the first network fails, try the next, then turn Automatic back on once you are connected.
Need help now?
If the eSIM still does not install or connect, open support with your phone model and the exact step where the flow stopped.